Home canning is a great way to preserve your garden harvest. It's also a fun family activity that creates good memories and wonderful products that can be savored year round by working together .
BASIC CANNING EQUIPMENT
jars, lids and bands
tongs and jar lifter
stock pot and sauce pan
extra large bowl and medium bowl
STEAM JUICER
I use my steam juicer for just about everything. Grape juice, salsa, marinara, tomato sauce, apple sauce/ juice, pumpkin
VICTORIO STRAINER
Once I've steam juiced the fruit or vegetable, then put it through the strainer. It automatically strains off the seeds, skins, etc leaving the pulp for salsa, apple sauce, etc. Love it!
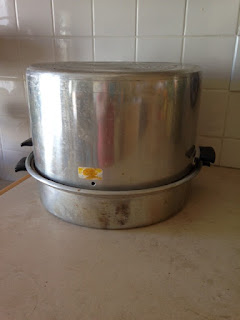
STEAM CANNER
Steam canners are used to seal bottles of fruit or tomato products that have enough acid in them and don't need pressure canning.
PRESSURE CANNER
Pressure canners are used for bottling meats, dry beans, and vegetables other than tomatoes.
TERMS
“Raw
Pack” foods that would be delicate after they are cooked, such as whole
peaches, are usually easier to handle if they are raw packed. Pack food in jars
while it is raw. It should be packed firmly but should not be crushed. After
packing, boiling syrup, juice or water is added to foods that require
additional fluid.
“Hot
Pack” the hot pack method is generally preferred where the food being canned is
relatively firm and handles well. Precooking the food makes it more pliable,
permits a tighter pack and requires fewer jars. Generally, the food is first
cooked in water, a syrup or in the juice that is extracted.
“Head Space” is the space between the inside of the lid and the top of the food or its liquid. Some foods, especially those that are starchy, swell more in the canner than others and therefore, require more head space.
RESOURCES
Utah
State University Extension Service
National Center for Home Food Preservation
Food
Storage Organization blog post:
STRAWBERRY JAM
Ingredients:
strawberries
Pectin
sugar
butter
Start by preparing and sterilizing jars and bands in dishwasher and set aside.
Place new lids and bands in large sauce pan and cover with water. Bring to boil while preparing strawberries.
In extra large bowl, wash strawberries
stem and cut berries in half .

coarsely grind strawberries in blender or food processor.
Measure puree according to recipe and add to stock pot with pectin
bring to boil while stirring for 1 min
add 1/2 tsp. butter to keep foam down while boiling.
measure out sugar in medium bowl according to recipe
add sugar all at once, stir in well
boil 5 more minutes at full rolling boil.
Immediately pour jam into jars, leaving 1/4 inch headspace.
Place lids on each jars and tighten down with bands. Turn upside down for 5-10 min
Turn right side up and let cool and listen for "plink" and you know it's sealed.
When a jar is used up and washed in the dishwasher, place old lid on top of jar upside down so rubber doesn't stick to rim and tighten down band. This will keep jar clean for the next batch and can be rinsed out in hot water.
BOTTLED BUTTER
Ingredients: 1 pound of butter per pint
I use half and half salted and unsalted butter. My family thinks it's too salty after it's on the shelf a while if I just use salted butter.
Place jars on baking sheet in over at 250 degrees for 20 min. while preparing butter.
Place new lids and bands in sauce pan and fill with water. Bring to boil.
Slowly melt butter and bring to boil for 5 min. while stirring.
Immediately fill jars to 1/4 inch headspace before separation starts.
Place lids and bands on jars.
Listen for "plink" and then shake a few times over the next 20 min.
to keep from separating.
While slightly warm, place in refrigerator
for 1 hour.
Directions found on everythingunderthesunblog.blogspot.com
BOTTLED DRY BEANS
The night before you plan to bottle beans, place them in a large stock pot and cover with 3x more water than beans and let soak over night.
Return beans to stock pot, peel and quarter an onion, add fresh water and bring to boil.
Prepare lids and bands in large sauce pan. Cover with water and bring to boil while beans are boiling.
Boil beans for 30 min. Then strain out and fill jars to 1 inch head space.
Add 1 tsp salt to each jar.
Fill each jar with water to 1 inch head space. Use tap water instead of water used from boiling beans in order to remove as much of enzyme as possible and help digestion when consuming beans.
Place lids and bands on jars.
Place jars in the pressure canner and cover with water.
Lock lid in place and bring to boil. Once steam is coming out of valve, start timing 10 min. This will let all air escape.
After 10 min, place weight on valve.
Once pressure gauge reaches 10 pounds pressure, start timing processing time. Turn stove unit to low and monitor pressure throughout process, adjusting heat if necessary. Refer to Ball home canning book or extension service web site for pounds and processing time according to your altitude. After processing time is complete, turn off stove and allow canner to cool. Do not remove weight until pressure gauge reaches 0.
Use jar lifter to remove bottles from canner and allow to cooling to continue.
Once bottles are cooled, wipe with damp cloth and label with permanent marker with contents and year. Enjoy!


This is amazing! I will definitely be bookmarking this and coming back to it when I'm ready to buy some canning equipment! HOPEFULLY I can get into it! :)
ReplyDelete