Friday, December 2, 2016

Christmas Topiary Tree- Easy Decorating


Fast and easy decorations!


Supplies
48" obelisk
4- .25 inch dowels
craft wire, ornament hangers, zip ties or string to tie garland to obelisk
4- 6 ft boxwood garlands
2- 15 ft evergreen
green or brown paint for dowels to match obelisk
lights and ornaments, optional

This obelisk was on Amazon for $26.  I've wanted one for the garden for a long time and now I can use it as a dual purpose!

evergreen garlands from the dollar store

black Friday sale for boxwood garland

Begin by cutting dowels to height of obelisk and and paint to match metal. Secure 1 in each large space with wire, zip ties, etc.

Next, bend one end of evergreen garland around post of obelisk.  Wrap garland around obelisk leaving large spaces in between each row.  When you get to the end, bend around another post of obelisk, repeat with second garland.

Now start attaching the boxwood garland by wiring/ tying one end of garland to obelisk and wrap tightly between evergreen or every 2 rows of evergreen.  I only secured the ends so that if I needed to adjust the density, I could do it quickly and not have to undo a bunch of ties.  By wrapping it tightly, it seemed that securing only the ends worked ok.

add lights

add ornaments

and that's it. It's ready for the porch!


lanterns and silk poinsettias make decorating easy

slip covers for couch throw pillows are a quick way to add color.


Saturday, November 12, 2016

Make an Easy Fill Soap Pumper


Make an easy fill soap pumper from a candle jar.

Equipment:
Drill motor
safety goggles
spray bottle for water
diamond hole saw bit- 24mm (I got it on Amazon for about $5.00)
dremil tool with cut down tool


supplies:
candle jar with glass gasket lid
sanitizer bottle and pump

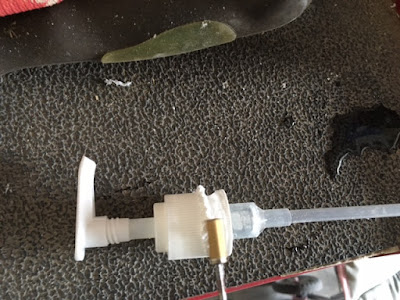
Cut off the top of the sanitizer bottle as the anchor.  The collar of the pump will need to be cut down because the threads of the collar don't run the whole length of the collar.  I found that only sanitizer bottles have long enough necks to go through thicker glass lids.

You may want to mark the center with a permanent marker before drilling.
Put on your safety goggles and gloves.

spray some water on the lid before drilling.

The bit jumps around quite a bit before it takes hold and can scratch the top. The best position for me to stabilize the drill is sitting on the floor, cross legged with the jar between my legs and the bottom of the drill against my right knee (since I'm right handed). Using very light pressure at first so the bit isn't dancing all over the top and scratching it, gradually add a bit more pressure.

Stop drilling often and spray more water. To keep drill bit from becoming hot, use enough water and not too much pressure.  Bit should never be more than warm.

Use a few tissues to clean out the pieces of glass and water.  Rinse of jar and lid.

cut down the collar of the sanitizer bottle pump so the threads will match up with the base when you put it together. Use the glass plug you cut out as a guide for how much to take off.  Not all glass lids are the same thickness.

Push the sanitizer bottle base through the hole in the glass top and screw pump down snug.

Done!  And easy to refill- enjoy!


Saturday, July 2, 2016

Red Beaded Wreath


Beautiful Christmas wreath made from thrift store garlands.  This will take some time to put together, but it will last and not break apart like the foam berries on store bought cranberry wreaths.  This project took me about 3 yrs to finish because I just couldn't figure out the best way to get the beads on the wreath.  So the supply list is approximate because I can't remember that long ago.  Once I figured it out, and had all the beads strung on wire (with the help of my daughters and grand children) it went together fairly quickly.

Supplies
3/8" bead garland about 5-6 lengths
1/2" bead garland about 4 lengths
5/8" bead garland about 3 lengths
large package of clear red pony beads
14 inch Styrofoam wreath
.5 yard red cotton fabric
6 packages of red craft wire, 26 gauge?
14" piece of red felt
glue gun


Tear cotton fabric in 2" strips and wrap around Styrofoam wreath. Secure end of wrap with hot glue or a few stitches of thread.

Start wrapping the 3/8" garland around the wreath.  Secure ends to wreath with wire.  Connect another garland to the end of the last one with a piece of wire. You may also want to make a loop for hanging the wreath at this point or at the end.


Once wreath is completely wrapped in 3/8" garland, cut a package of red wire in 24" lengths and start stringing beads on in random sizes.  Make sure to use pony beads in the middle 1/3 part of the strand since that will be where it wraps on the inside of the wreath (smallest circumfrence). Leave 1.5-2 in wire on each end.  Stringing the beads on wire is what takes the most time.  If you have some friends or family members to help you, it goes much quicker.

Once you have all the strands of beads loaded, take 3 strands and twist the ends together.  We are going to braid them together.

Loosely braid the 3 strands together, twist ends together when done. 

Repeat with remaining bead strands.

Use one braided strand at a time to wrap around wreath by threading about a 12" piece of wire thru 2 of the beads on one end.

Wrap braided strand around wreath so it is snug and twist the opposite ends of wire together.

It hard to see red on red. This is showing 3 braided strands attached to wreath.

This is the completed wreath from the backside.

close up of back side.

Lay wreath on felt and trace around.

Cut out felt by trimming 1" or more from each side of traced line. (You don't want to see any felt from the sides of your wreath.)

Fold felt circle in half and lay on the back of the wreath.  Apply hot glue to both edges of this half of the felt circle (working quickly before glue cools.) then fold over and press on wreath.  Repeat with other side of felt circle. Now you're done and have a beautiful lasting decoration! Enjoy :)


Monday, April 18, 2016

Home Canning

Home canning is a great way to preserve your garden harvest.  It's also a fun family activity that creates good memories and wonderful products that can be savored year round by working together .

BASIC CANNING EQUIPMENT
jars, lids and bands
tongs and jar lifter
stock pot and sauce pan
extra large bowl and medium bowl

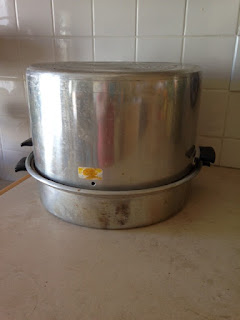
STEAM JUICER
I use my steam juicer for just about everything. Grape juice, salsa, marinara, tomato sauce, apple sauce/ juice, pumpkin

VICTORIO STRAINER
Once I've steam juiced the fruit or vegetable, then put it through the strainer.  It automatically strains off the seeds, skins, etc leaving the pulp for salsa, apple sauce, etc.  Love it!

STEAM CANNER
Steam canners are used to seal bottles of fruit or tomato products that have enough acid in them and don't need pressure canning.

PRESSURE CANNER
Pressure canners are used for bottling meats, dry beans, and vegetables other than tomatoes.

TERMS
“Raw Pack” foods that would be delicate after they are cooked, such as whole peaches, are usually easier to handle if they are raw packed. Pack food in jars while it is raw. It should be packed firmly but should not be crushed. After packing, boiling syrup, juice or water is added to foods that require additional fluid. 

“Hot Pack” the hot pack method is generally preferred where the food being canned is relatively firm and handles well. Precooking the food makes it more pliable, permits a tighter pack and requires fewer jars. Generally, the food is first cooked in water, a syrup or in the juice that is extracted.

“Head Space” is the space between the inside of the lid and the top of the food or its liquid. Some foods, especially those that are starchy, swell more in the canner than others and therefore, require more head space.

RESOURCES
Utah State University Extension Service

National Center for Home Food Preservation
http://nchfp.uga.edu/

Ball Brand Blue Book for Home Canning

 Food Storage Organization blog post:


STRAWBERRY JAM
Ingredients:
strawberries
Pectin
sugar
butter

Start by preparing and sterilizing jars and bands in dishwasher and set aside.

Place new lids and bands in large sauce pan and cover with water.  Bring to boil while preparing strawberries.

In extra large bowl, wash strawberries

stem and cut berries in half .

coarsely grind strawberries in blender or food processor.
Measure puree according to recipe and add to stock pot with pectin

bring to boil while stirring for 1 min

add 1/2 tsp. butter to keep foam down while boiling.

measure out sugar in medium bowl according to recipe

add sugar all at once, stir in well

boil 5 more minutes at full rolling boil.

Immediately pour jam into jars, leaving 1/4 inch headspace.

Place lids on each jars and tighten down with bands. Turn upside down for 5-10 min

Turn right side up and let cool and listen for "plink" and you know it's sealed.

When a jar is used up and washed in the dishwasher, place old lid on top of jar upside down so rubber doesn't stick to rim and tighten down band.  This will keep jar clean for the next batch and can be rinsed out in hot water.


BOTTLED BUTTER
Ingredients: 1 pound of butter per pint
I use half and half salted and unsalted butter.  My family thinks it's too salty after it's on the shelf a while if I just use salted butter.

Place jars on baking sheet in over at 250 degrees for 20 min. while preparing butter.

Place new lids and bands in sauce pan and fill with water. Bring to boil.

Slowly melt butter and bring to boil for 5 min. while stirring.
Immediately fill jars to 1/4 inch headspace before separation starts.
Place lids and bands on jars. 
Listen for "plink" and then shake a few times over the next 20 min.
to keep from separating.
While slightly warm, place in refrigerator
for 1 hour. 
Directions found on everythingunderthesunblog.blogspot.com


BOTTLED DRY BEANS
The night before you plan to bottle beans, place them in a large stock pot and cover with 3x more water than beans and let soak over night.

In the morning, drain beans and rinse well. Beans have an enzyme to keep them from sprouting.

 Return beans to stock pot, peel and quarter an onion, add fresh water and bring to boil.
Prepare lids and bands in large sauce pan. Cover with water and bring to boil while beans are boiling.

 Boil beans for 30 min. Then strain out and fill jars to 1 inch head space.

Add 1 tsp salt to each jar.

Fill each jar with water to 1 inch head space. Use tap water instead of water used from boiling beans in order to remove as much of enzyme as possible and help digestion when consuming beans.

 Place lids and bands on jars.

Place jars in the pressure canner and cover with water.

Lock lid in place and bring to boil.  Once steam is coming out of valve, start timing 10 min. This will let all air escape. 

After 10 min, place weight on valve.

Once pressure gauge reaches 10 pounds pressure, start timing processing time. Turn stove unit to low and monitor pressure throughout process, adjusting heat if necessary. Refer to Ball home canning book or extension service web site for pounds and processing time according to your altitude.  After processing time is complete, turn off stove and allow canner to cool.  Do not remove weight until pressure gauge reaches 0.

Use jar lifter to remove bottles from canner and allow to cooling to continue.

 Once bottles are cooled, wipe with damp cloth and label with permanent marker with contents and year.  Enjoy!